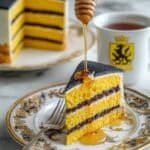
Homemade Hufflepuff’s Layer Cake Recipe
A delightful homemade Hufflepuff’s Layer Cake featuring moist, buttery yellow layers with a rich chocolate ganache filling and smooth yellow buttercream frosting. Perfect for Harry Potter fans and special occasions, this cake combines classic baking techniques with whimsical colors and a luscious finish.
- Prep Time: 20 minutes
- Cook Time: 25 minutes
- Total Time: 1 hour 45 minutes
- Yield: 12 servings
- Category: Dessert
- Method: Baking
- Cuisine: American
Ingredients
For the Cake
- 2 cups all-purpose flour (substitute with gluten-free flour mix if needed)
- 1 tbsp baking powder (fresh for best rise)
- 1/2 tsp salt
- 1 cup unsalted butter, softened (vegan butter for dairy-free option)
- 1 3/4 cups granulated sugar (brown sugar can be used for deeper flavor)
- 4 large eggs (flax eggs as vegan alternative)
- 2 tsp vanilla extract (pure vanilla preferred)
- 1 cup whole milk (any plant-based milk for dairy-free version)
- Several drops yellow gel food coloring (optional; turmeric as natural alternative)
For the Ganache
- 1 cup heavy cream (coconut cream for non-dairy substitute)
- 2 cups semi-sweet chocolate chips (dark chocolate for deeper taste)
- Several drops black gel food coloring (optional)
For the Frosting
- 3 cups powdered sugar (add cornstarch for stability if homemade)
Optional Decorations
- Additional decorations such as edible gold dust or themed cake toppers
Instructions
- Preheat and Prepare Pans: Preheat your oven to 350°F (175°C). Grease and flour three 8-inch round cake pans to ensure easy cake release and even baking.
- Mix Dry Ingredients: In a mixing bowl, whisk together 2 cups of all-purpose flour, 1 tablespoon of baking powder, and 1/2 teaspoon of salt until well combined.
- Cream Butter and Sugar: Using a stand mixer, beat 1 cup of softened unsalted butter with 1 3/4 cups of granulated sugar on medium speed until the mixture turns light and fluffy, which incorporates air for a tender crumb.
- Add Eggs and Vanilla: Add 4 large eggs one at a time to the butter and sugar mixture, beating well after each addition. Stir in 2 teaspoons of vanilla extract for flavor.
- Combine Wet and Dry Ingredients: Gradually add the dry ingredients to the wet mixture, alternating with 1 cup of whole milk. Mix just until combined to avoid overworking the batter, which could make the cake dense.
- Bake the Cakes: Divide the batter evenly among the prepared cake pans and bake in the preheated oven for 20-25 minutes, or until a toothpick inserted into the center comes out clean. Allow to cool completely.
- Prepare Ganache: In a small saucepan, heat 1 cup of heavy cream until it begins to simmer. Pour the hot cream over 2 cups of semi-sweet chocolate chips in a bowl. Let it sit briefly, then stir until smooth and glossy. Add black gel food coloring if desired and mix evenly.
- Level and Assemble: Once the cakes are fully cooled, use a serrated knife to level the tops for stability. Stack the cake layers, spreading ganache evenly between each layer for a rich filling.
- Apply Crumb Coat: Frost the assembled cake with a thin crumb coat of yellow buttercream frosting to seal in crumbs. Refrigerate for 30 minutes to set the crumb coat.
- Final Frosting and Ganache Drizzle: Apply a final smooth layer of yellow buttercream frosting all over the cake. Drizzle with the cooled ganache evenly over the top and sides for a decadent finish.
- Chill and Serve: Chill the cake for at least 30 minutes to allow set before slicing and serving. Optionally, decorate with edible gold dust or themed cake toppers for extra flair.
Notes
- Substitute all-purpose flour with gluten-free mix for gluten-free diets.
- Use vegan butter and flax egg substitutes for a dairy-free and egg-free version.
- Yellow gel food coloring can be replaced with natural turmeric powder for a subtle yellow tint.
- The ganache can be made dairy-free by using coconut cream instead of heavy cream.
- Ensure baking powder is fresh to achieve a good rise in the cake.
- Chilling the cake after crumb coating helps set the frosting and makes the final decorating easier.
- Store leftovers covered in the refrigerator and consume within 3-4 days for best freshness.
Find it online: https://oliviabakes.com/homemade-hufflepuffs-layer-cake-recipe/

